Common Terms:
- synchronization - making the information the same on two different applications
- WAP/GPRS - wireless Internet access for mobile phones
- SyncML - a synchronization protocol
This is the setup I am trying to sync:
- Calendars
- Contacts
- Gmail for email addresses
- Microsoft Outlook at home for contacts
- Gadgets
- Nokia 6682
for access to contacts/calendar on the go (or any mobile phone that has
software to synchronize with Microsoft Outlook, ie: all of them)
- iPod for access to contacts/calendar on the go
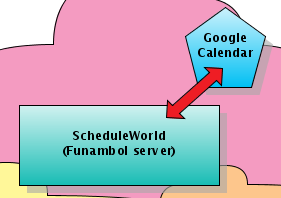
ScheduleWorld wasn’t something I used before I tried to do this, but it is the glue that holds it all together.
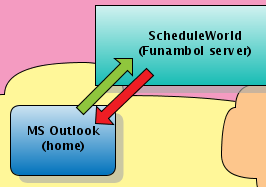
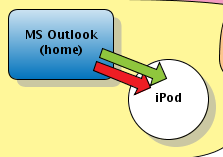
Here is a beautiful drawing of The Plan. It was made with Gliffy, a web-based Visio clone.
This is how I want to sync it (follow the diagram):
- Contacts are sourced from my Phone + Outlook (at home).
- Calendar is sourced from Outlook (at work), Google Calendar, ScheduleWorld.
- I only want to synchronize my phone/iPod when I’m at home (so I don’t have to bring the USB cables back and forth)
- I don’t want to synchronize over WAP/GPRS (wireless data) because I am a cheap. My local wireless provider charges too much.
It should be easy to extend these instructions to your specific
situation. If this isn’t your boat I also list some alternatives at the
end of the article. If you have a specific question, post a comment and
I’ll try to answer it. Sometimes the owner of ScheduleWorld pops by and
gives suggestions as well.
But why?
- Why use Outlook? Isn’t Microsoft “Outbreak” the devil?
- I won’t be using Outlook for email. Outlook is a necessary evil if
you want to do contacts synchronization since it is the only software
that you mobile phone supports synching with. - ScheduleWorld also supports Evolution/Linux and Thunderbird/Windows.
- What about Linux/Mac OS X support?
- Microsoft Outlook is fundamental to how I’m moving the data from my computer to my phone/iPod.
- You can replace Microsoft Outlook with Evolution or Thunderbird and still use it with ScheduleWorld.
- Why not source contacts from Gmail?
- You can’t automatically sync Gmail to anything.
- If you have a free solution for synching Gmail to Outlook then please post a comment.
- Gmail also adds any you’ve emailed to your address book automatically. Gets cumbersome.
- Why use ScheduleWorld?
- It’s there. It’s free. It automatically supports Google Calendar synching.
- The interface for ScheduleWorld looks like PHP iCalendar. You could run your own Funambol
server instead, but it wouldn’t be as slick. No, Funambol isn’t a
clever name for a new hemorrhoid cream. ScheduleWorld uses the Funambol
server for SyncML interoperability and that’s it. - ScheduleWorld is quite a large project and does a number of things outside of SyncML.
- Why don’t you sync email?
- I like using computers for email. My thumb gets sore.
- The approach I’ve outlined doesn’t sync email. I’d recommend using Mobile Gmail with a data plan to access mail on your phone and on any computer.
- Why don’t you use Remote Calendars and cut ScheduleWorld out of the loop altogether?
- I tried Remote Calendars and I found it a bit of a pain. It
requires three other Microsoft tools installed (.NET, Office Something,
VSO). It would still give me “Invalid URI” errors even though it was
synching properly. Screw that. The Funambol Outlook plug-in is simple.
#1. Synching Phone to Outlook
I used a fresh install of Microsoft Outlook. I chose not to
associate it with an email address or import data from Microsoft
Outlook Express. You could use an existing install.
Connect phone to PC.- (Optional) Use Nokia/phone supplied software to BACKUP existing phone contacts.
- Use the Nokia/phone supplied PC Suite synchronization software to
sync existing phone contacts to Outlook (also synching Calendar, Notes,
To-do).
#2. Synching Gmail to Outlook (at home)
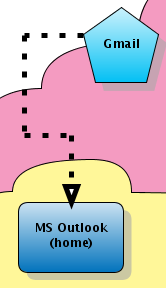
There are several solutions out there, but I recommend manually
updating by downloading your Gmail contacts to a CSV file and then
importing it into Outlook. More information on CSV files here.
- Login to Gmail and export contacts:
Contacts >> All Contacts >> Export >> Outlook CSV >> Export Contacts
- (Optional) I recommend loading it into Excel and hand-merging the
contacts with the contacts you copied from your phone. Delete all the
hand-merged and unnecessary contacts and THEN import the pared down CSV
file into Outlook.This really is the best way. Every one of your
friends has three different email addresses. You have to hand-merge
them, and no program is going to do it for you (properly). It goes
faster than you might think. - Import the merged contacts into Outlook:
File >> Import from another program or file
>> CSV (Windows) >> [Browse] >> Next >>
[Contacts] >> Next >> Finish
- (Optional) Now comes the fun part. Sift through the Outlook
Contacts list a few times and make sure the data is correct. Now is the
time to remove duplicates, before they’re synched everywhere else. That
person from the bar that time? Probably don’t need that number. - Go take a break and have some cookies and a glass of milk. Watch
something on TV. I think America’s Next Top Model is on. Then sift
through the address book again. - (Optional) BACK UP THE OUTLOOK CONTACTS! You won’t be doing
anything with them, but if something screws up this could be an
essential recovery point.
File >> Export >> CSV (Windows) >>
Next >> Contacts >> Next >> outlook-backup.csv
>> Next >> Finish.
#3. Synching Google Calendar to ScheduleWorld
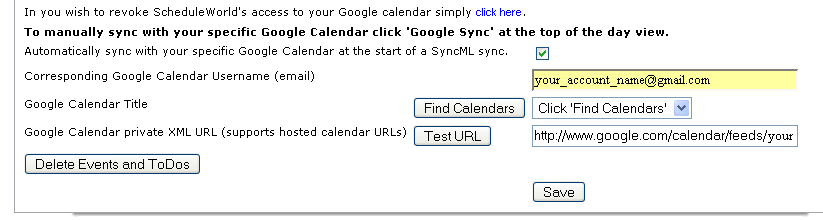
- Log in to ScheduleWorld and click on Preferences.
- Scroll down to the Calendar Preferences.
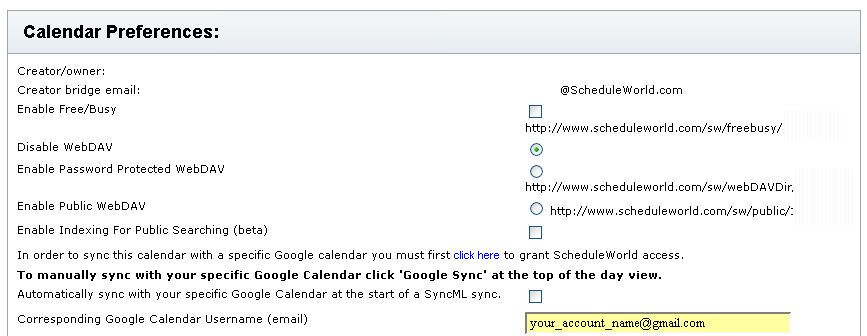
- Enter your Gmail account name that is used with your Google Calendar.
- Click “Grant Access” to allow ScheduleWorld to connect to your Google Calendar.
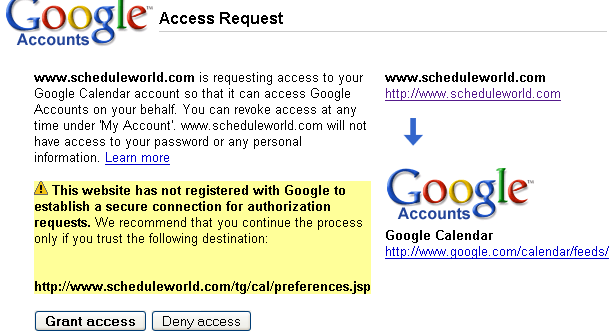
- ScheduleWorld is in the process of registering with Google
(2006/09/19), so by the time you try this there won’t be the same
yellow warning text.
- You will be taken back to the ScheduleWorld Preferences page.
- Click on the “Automatically sync with your specific Google Calendar…” checkbox.
- Click on the “Find Calendars” button, wait, and then select the calendar you want to sync from the drop down box.
- Click on the “Test URL” to make sure you can access the Google Calendar.
- Click “Save” to save your calendar Preferences.
- Under “Standard SyncML Client Configuration”, take note of your
ScheduleWorld server url, username, and password. Save it in notepad.
- Click on the supported clients link: http://www.scheduleworld.com/tg/syncmlInfo.jsp
- Download the Outlook client.
- NOTE: I had trouble getting the Funambol iPod synchronizer working, so we’ll use a different method (iTunes).
#4. Synchronizing Outlook (at work) to ScheduleWorld
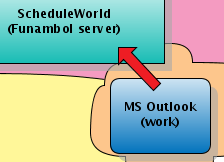
- Close Outlook and install the Funambol Outlook plug-in at http://www.scheduleworld.com/tg/syncmlInfo.jsp
- Run the plug-in.
Start >> All Programs >> Funambol >> Outlook Plug-in >> Funambol Outlook Plug-in
- Input configuration settings for ScheduleWorld.
Configuration >> Edit >> Communication Settings >> [Input ScheduleWorld url, userid and password]
- At work I want to push the calendar to ScheduleWorld (one way sync) and I don’t want to sync contacts. You may want to do something else, like use File >> Recover (slow sync) for two-way synchronization.
Configuration >> Edit >> Synchronization
Settings >> [unclick Contacts] >> [Calendar: Update remote
data]
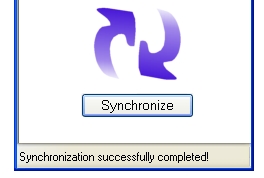
- Click Synchronize and wait
- .
- Set up automatic synchronization.
Configuration >> Edit >> Scheduler Settings
>> [Click activate] >> [Set the time period, I chose 12
hours]
I set up my Outlook at work to synchronize automatically every day at 5pm/5am (before my home syncs).
#5. Synchronizing Outlook (at home) to ScheduleWorld
- Close Outlook and install the Funambol Outlook plug-in at http://www.scheduleworld.com/tg/syncmlInfo.jsp
- Run the plug-in.
Start >> All Programs >> Funambol >> Outlook Plug-in >> Funambol Outlook Plug-in
- Input configuration settings for ScheduleWorld.
Configuration >> Edit >> Communication Settings >> [Input ScheduleWorld url, userid and password]
- At home I want to push the contacts (one way sync) and pull the calendar (one way sync). You may want to do something else, like use File >> Recover (slow sync) for two-way synchronization.
Configuration >> Edit >> Synchronization
Settings >> [Contacts: Replace remote data] >> [Calendar:
Replace local data]
- Click Synchronize and wait. A while. Got any more milk and cookies?
- Set up automatic synchronization.
Configuration >> Edit >> Scheduler Settings
>> [Click activate] >> [Set the time period, I chose 12
hours]
I set up my Outlook at home to synchronize automatically every day at 6pm/6am (after my work syncs).
#6. Synchronizing Gmail with ScheduleWorld
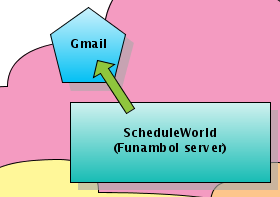
The Gmail / ScheduleWorld synchronization isn’t automatic, but it does
allow you to push your contacts from ScheduleWorld to Gmail. Instead of
exporting from ScheduleWorld, you could simple export from Outlook (at
home) to Gmail as documented here.
I like using the ScheduleWorld approach because it will only
synchronize contacts with email addresses. You can also use
ScheduleWorld as an LDAP server for Gmail.
- Log in to ScheduleWorld:
Contacts >> Utils >> Download Contacts in Google Format >> [Save GoogleImportContacts.csv]
- Log in to Gmail.
- (Optional) Delete existing Gmail contacts.
Contacts >> All Contacts >> Select All >> Delete
- Import contacts.
Contacts >> Import >> [Browse to GoogleImportContacts.csv]
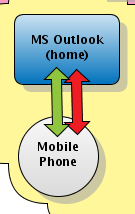
#7. Synchronizing iPod with Microsoft Outlook using iTunes
- Connect iPod.
- Open Outlook.
- Open iTunes.
Edit >> Preferences >> iPod >>
Contacts >> Synchronize contacts from: Microsoft Outlook >>
Calendars >> Synchronize calendars from Microsoft Outlook
>> Ok
- Go to Outlook and look for “A program is trying to access” dialog box and choose “Allow access for 10 minutes” / “Yes”
- Wait, but not very long.
Your Microsoft Outlook contacts/calendars will be synced whenever you connect your iPod and run iTunes.
Known Issues:
- This is a Windows solution that requires Microsoft Outlook, but
that is only because Outlook is the only thing supported by my Nokia
6682 cellphone.
- ScheduleWorld supports Thunderbird/Evolution.
- Manually synching your phone to your computer via Bluetooth / cable
is pointless if you have a flat GPRS data rate. I don’t. You can
directly sync your phone to ScheduleWorld over GRPS, and skip a bunch
of steps. - Gmail synchronization is manual, not automatic.
- ScheduleWorld only supports synching to (1) Google Calendar (but there are plans to support more).
- This solution is dependant on ScheduleWorld.
- May need Microsoft Office opened before autosync to iPod using iTunes.
Source: The Holy Grail of Synchronization (internetducttape.com)